
Disclaimer: All guides provided are generalized information for personal troubleshooting. None of which are certified by the respective part manufacturers. Any improper installation/removal, mishandling, or negligence on your part, will be counted as physical damage and therefore void your warranty. If you have at anytime concerns or wariness please contact our technician support.
All pictures provided may differ to your own system configurations and components.
Tech Tips Video: How to Remove and Reinstall your Video Card
To learn more about what is covered in your warranty please refer to the following articles:
CyberPowerPC Limited Warranty Policy
CyberPowerPC Ecommerce Limited Warranty Policy
Removing Your Video Card
Some systems but not all may have onboard graphics available, and this may help to determine if the problem is isolated to the video card and not other parts of the system.
- First, ensure that your PC is not powered on and power is disconnected from the wall.
- Disconnect the monitor from the graphics card.
- Remove the computer's side panel to get access to the internal components of the PC.
- Identify the video card. Figure 1.
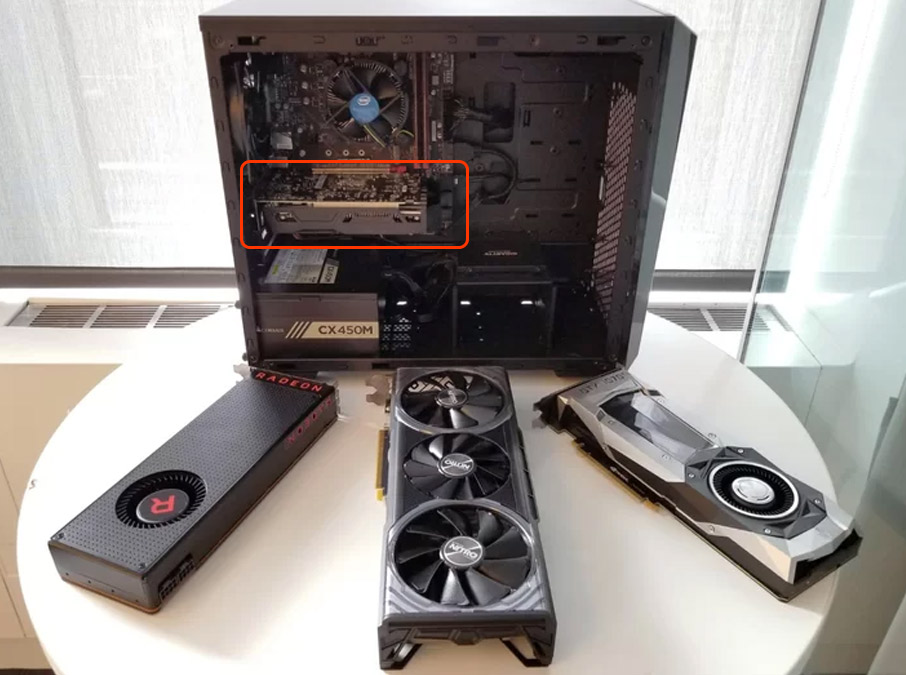 Figure 1
- Discreet add-on video cards (graphics card / GPU) are generally large and most of the time have one or more fans attached to it.
- Unplug any power cables connected to the video card. Figure 2.
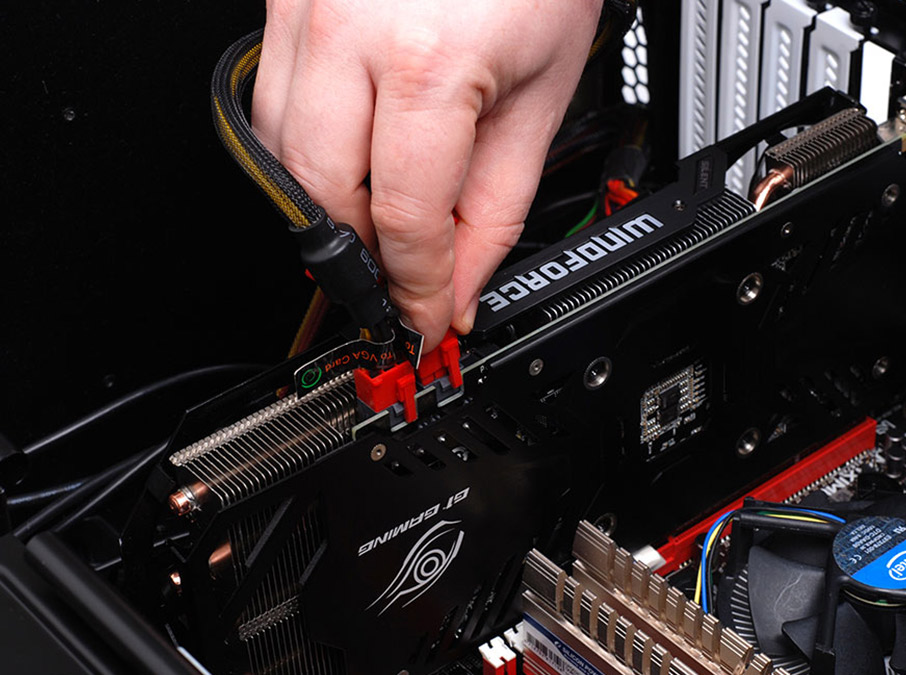
Figure 2 - If you have a dual graphics card setup, remember to remove the SLI bridge. Figure 3.
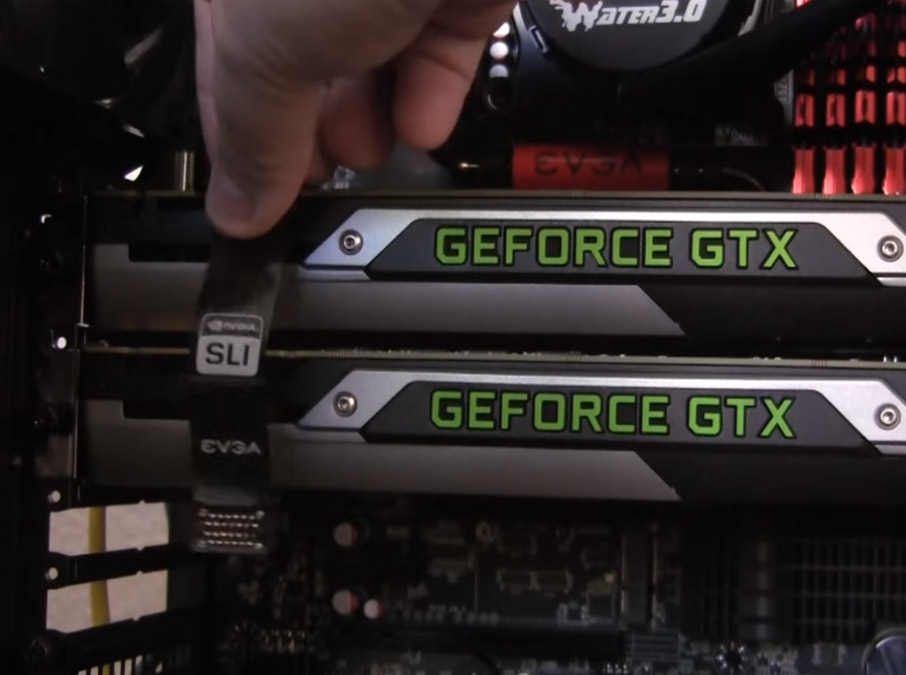
Figure 3 - Unscrew the video card from the case (this can be anywhere from 1 to 3 screws depending on how big your video card is). Figure 4.
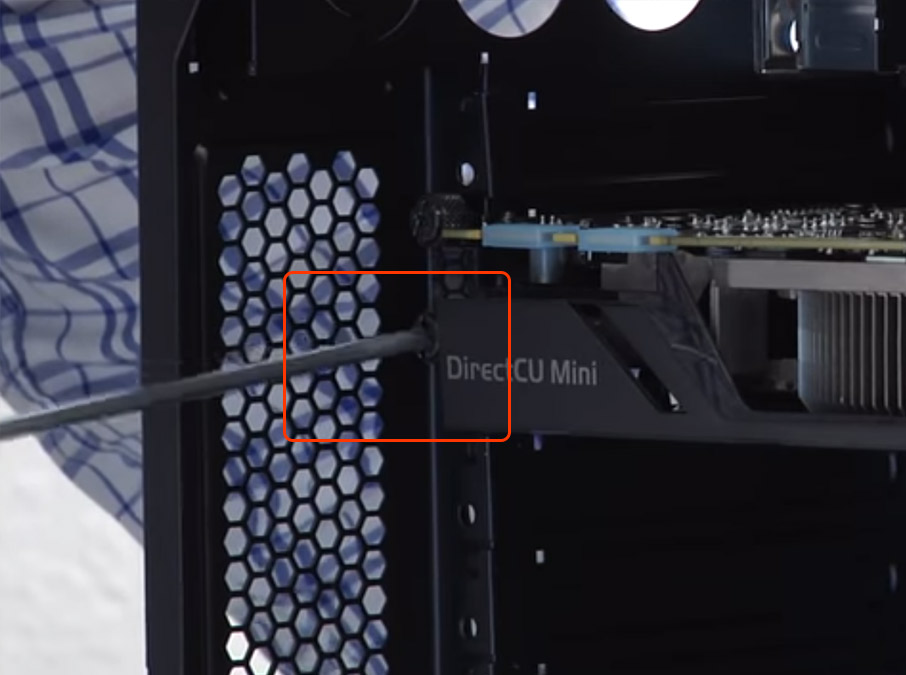
Figure 4 - While holding the video card by gripping the middle, carefully press down on the security lock latch on the PCI slot to release the video card from the lock. Figure 5.
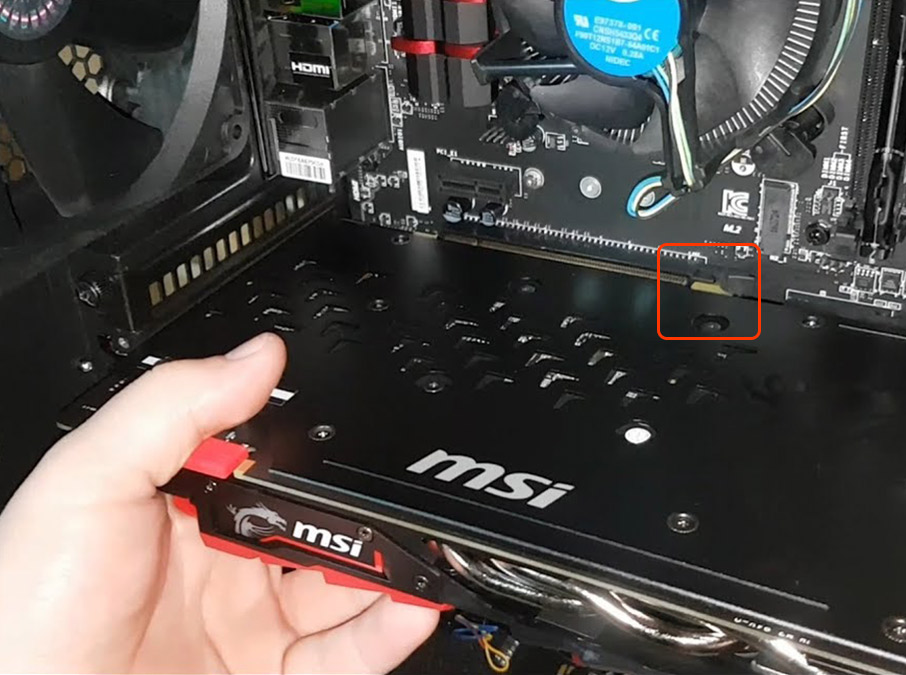
Figure 5
- It's important not to apply too much force as this may break the latch.
- Some latches flip out while others need to be pushed down and differ by manufacturer and model. It should unlock easily and the right side of the video card should pop out slightly once released.
- While still holding the video card, carefully pull it away from the motherboard and keep in mind that the card may be heavier than expected.
- Carefully place the video card in an anti-static bag, or on top of a cardboard box away from anything electrical.
Testing Onboard Graphics
- Connect your monitor to any of the available display outputs on the motherboard, located at the back of the computer. Figure 6.
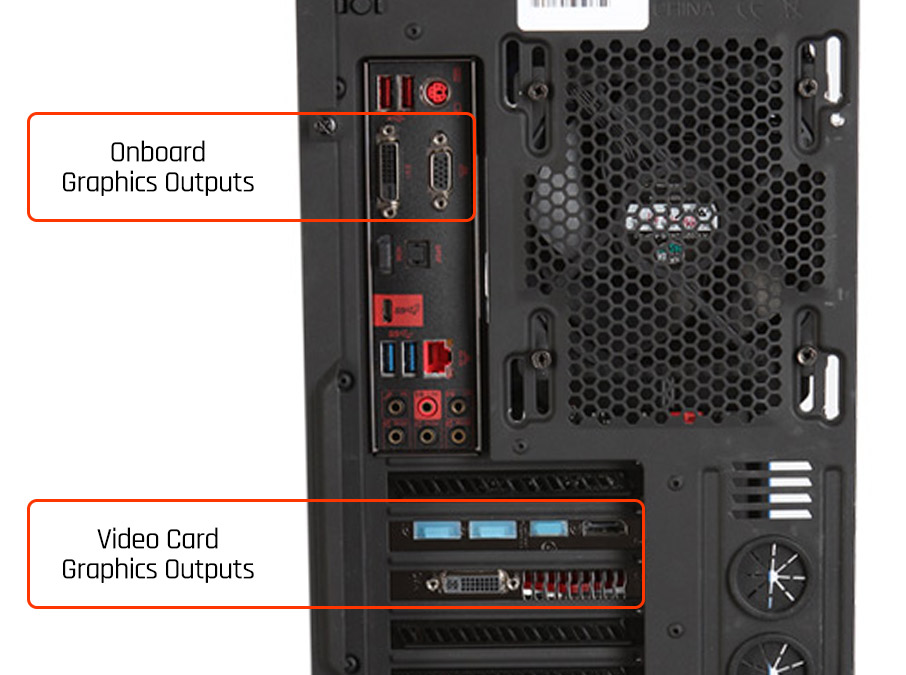
Figure 6
Note: Even though your computer's motherboard may have display output such as those shown in Figure 6, they may not be functional if the CPU you are using does not support onboard graphics. - Reconnect the power from your computer to the wall outlet.
- Turn on your computer to see if you are receiving any activity from your computer.
- If the problem still persists, it may be unrelated to your video card and may perhaps be some other issue.
- Follow the instruction below in the Reinstalling Your Video Card section below, to reinstall the graphics card you removed earlier.
Reinstalling Your Video Card
Follow these instructions to reinstall a previously removed video card.
- First, ensure that your PC is not powered on and power is disconnected from the wall.
- Remove the computer's side panel to get access to the internal components of the PC.
- While holding the video card by gripping the middle, carefully align the video card with the bracket slot and the PCI slot and push it into place. Figure 7.
Figure 7
- You should hear, see and feel the PCI lock snap into place and the bracket should be lined up with the case's screw holes.
- Place your thumbs on the edge of the graphics card and align them with the ends of the PCI slot on the motherboard and firmly push it towards the motherboard to make sure it is seated properly. Figure 8.
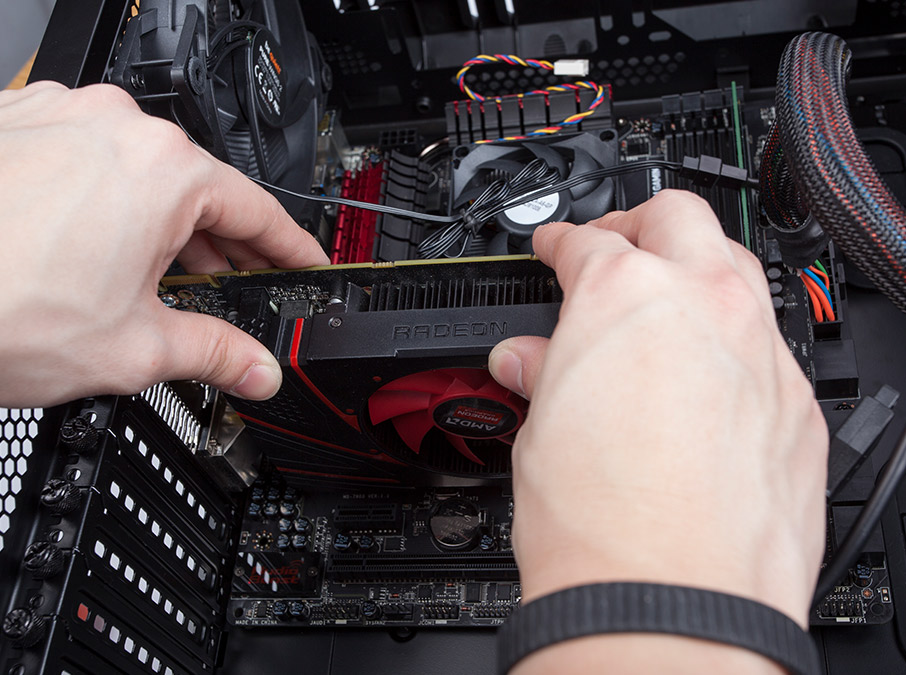
Figure 8 - Screw the video card bracket to the case. Figure 4.
Figure 4 - Plug in any power cables connected to the video card. Figure 2.
Figure 2 - If you have a dual graphics card setup, remember to reattached the SLI bridge to both video cards. Figure 3.
Figure 3 - Reinstall the computer case's side panel
- Connect your monitor to any of the available display outputs on the video card, located at the back of the computer.
- Reconnect the power from your computer to the wall outlet.
- Turn on your computer to see if you are receiving any activity from your computer.
- If you are still experiencing problems, please contact a technical support agent.
Comments
6 comments
Great, very clear walkthrough! A couple of extra tips that helped me when swapping between onboard and dedicated GPU:
BIOS Check – After removing the dedicated GPU, double-check in BIOS that onboard graphics is enabled. If your CPU supports it, sometimes it’s disabled by default.
Driver Cleanup – Before reinstalling the video card, uninstall old GPU drivers via Device Manager or DDU in safe mode to avoid conflicts/cloudy drivers.
Thermal & PSU Load Test – Use a lightweight browser-based performance test to monitor CPU/GPU load and temperatures. Personally, I ran a tool that simulates fast-moving data (like visualizing fastest trains in the world) — it stresses the integrated graphics to reveal any throttling or instability.
These extra checks helped ensure my system came back fully stable after switching GPUs.
Has anyone else found additional steps useful in this process?
BIOS Reset & IGPU Prioritization – If you're switching from a dedicated GPU to integrated graphics, it’s worth resetting BIOS settings and manually setting the primary display adapter to IGPU. Some boards don’t auto-switch reliably.
Clean Power-Off & Reseat – After removing the GPU, I did a full power-off, unplugged the PSU, and held the power button for 10 seconds. It helps drain residual charge before reseating RAM or other components.
Quick Display Boot Check – Before booting fully, I connected to onboard video and powered on briefly to check if POST visuals came through. Saves time in case the system’s still looking for a missing GPU.
These little tweaks helped make the transition smoother and avoid any no-display surprises.
Curious if others have workflow tips for going back to onboard graphics or prepping for a fresh GPU install?
Solid guide on swapping to iGPU – saved me hours diagnosing a faulty 3060 Ti last month!
Quick pro tip: Once you're booted on onboard graphics, test stability with Roblox open → inject Arceus X executor (Lua scripts for fly/ESP/godmode) → run a heavy script like auto-farm in Blox Fruits at 1080p 60fps. If no micro-stutters or crashes (under 80% CPU/GPU usage), your mobo/iGPU is solid; any hitches point back to the discrete card or PCIe lane issues. Handles cross-platform (Android emu on PC too) with zero detection on latest Hyperion.
Latest Arceus X build (AI scripting, full bypass, Script Hub unlocked)
Nailed my rig this way – game on without the bluescreen blues
Swapped to iGPU because my 3070 died mid-session... thought gaming days were over until the replacement arrives 😭
Then fired up Jump Force MUGEN 2025 edition on Intel UHD 630 and bro... still pulling 60 FPS locked in 4K with 500+ chars, screenpack, online netplay, and ultra combo effects flying everywhere. Zero input lag, no crashes, even with 8P simultaneous chaos.
If your onboard can survive Goku vs Naruto vs Luffy 200% damage mod for 20 minutes straight, your CPU/mobo/RAM is certified healthy. Best stress test while waiting for the new card.
Latest full 1.2 GB build (all arcs + 2025 roster + training mode),
iGPU gang eating good till the GPU comes home 🔥 Who’s pulling 100-hit combos on integrated graphics right now?
Testing onboard graphics is also a smart isolation step to confirm whether the GPU is actually the fault. Overall, very helpful for first-time troubleshooting before escalating to support.
This guide is clear, thorough, and very beginner-friendly, making hardware troubleshooting much less intimidating. The step-by-step instructions and visuals are especially helpful for safely identifying and isolating GPU issues. A great resource for users diagnosing graphics problems with confidence.
Article is closed for comments.