
How to enable TPM 2.0 on your CyberPowerPC System to prepare for Windows 11.
Not every existing PC running Windows 10 will be able to upgrade to Windows 11, though. Windows 11 will require Intel 8th Gen Coffee Lake or Zen 2 CPUs and up, TPM 2.0 (Trusted Platform Module) support, 4GB of RAM, and 64GB of storage. There are some extra workarounds you'll need to do if you want Windows 11.
If you follow the instructions above and you see the follow popup. 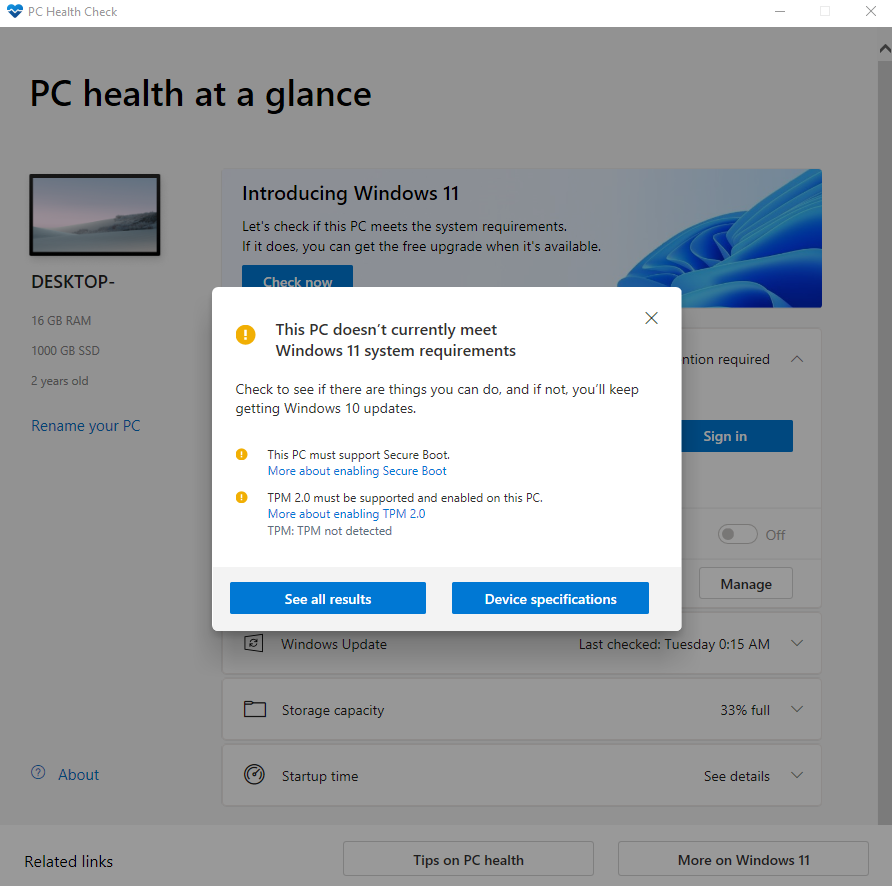
To prepare your system to make it ready for an upgrade, you'll need to enter your systems BIOS to make the necessary changes. See below for instructions for how to enter the BIOS on your computer and make the changes relative to your specific motherboard brand and CPU type.
Follow these steps:
- Power on your computer.
-
Press <Del> after the CyberPowerPC Logo or Motherboard Manufacturer's Logo appears.
Note: The screen may flash up quickly so you may need to try the above keystroke multiples times as there is a short window of opportunity for the system to recognize the key-press. (Del) -
Once the BIOS Setup screen appears match it to one of the following manufactures below for instructions specific to your BIOS
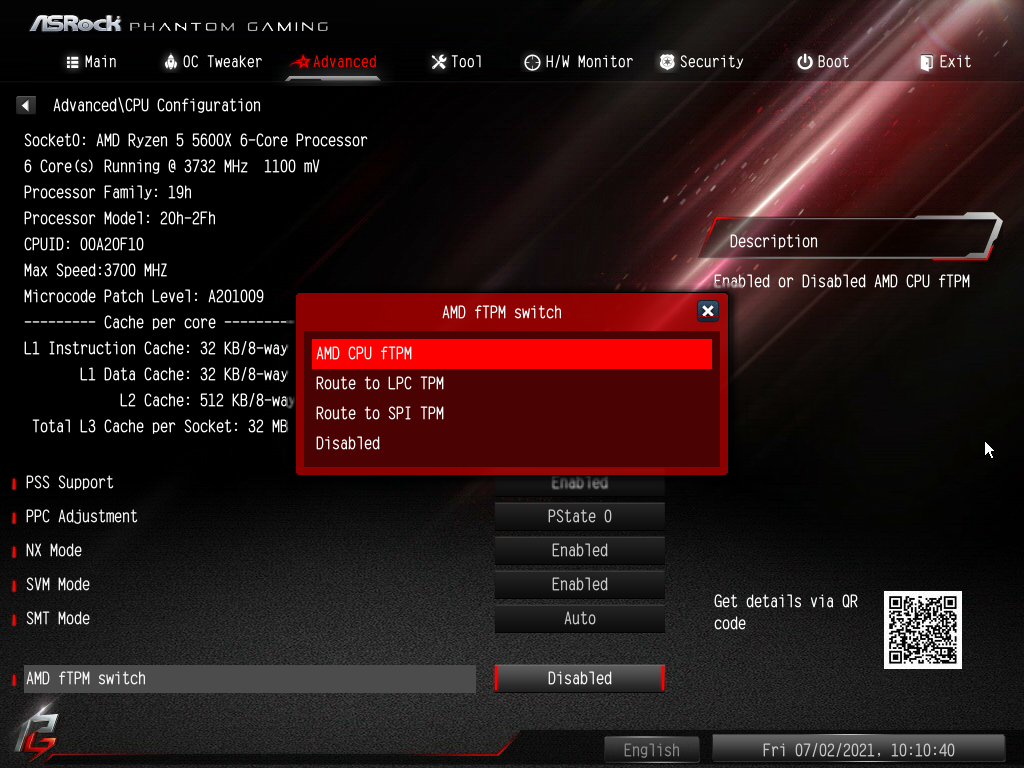
ASROCK AMD
- Click on the Advanced Tab at the top of the screen.
- Find the option AMD fTPM switch.
- Click the Disabled option to the right.
- Select AMD CPU fTPM to activate it.
- Now the line item should say AMD fTPM switch [ AMD CPU fTPM ].
- Click the Exit Tab on the upper right corner of the window.
- Select Save and Exit.
- Your computer should now restart and you can follow the instructions above to continue with your upgrade.
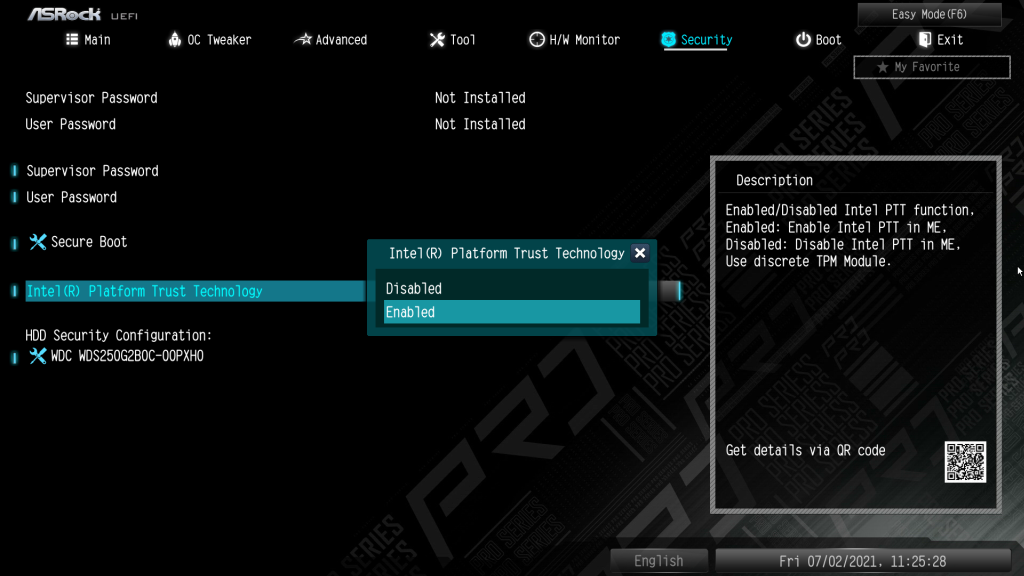
ASROCK Intel
- Click on the Security Tab at the top of the screen.
- Find the option Intel (R) Platform Trust Technology.
- Click the Disabled option to the right.
- Select Enabled to activate it.
- Now the line item should say Intel (R) Platform Trust Technology [ Enabled].
- Click the Exit Tab on the upper right corner of the window.
- Select Save and Exit.
- Your computer should now restart and you can follow the instructions above to continue with your upgrade.
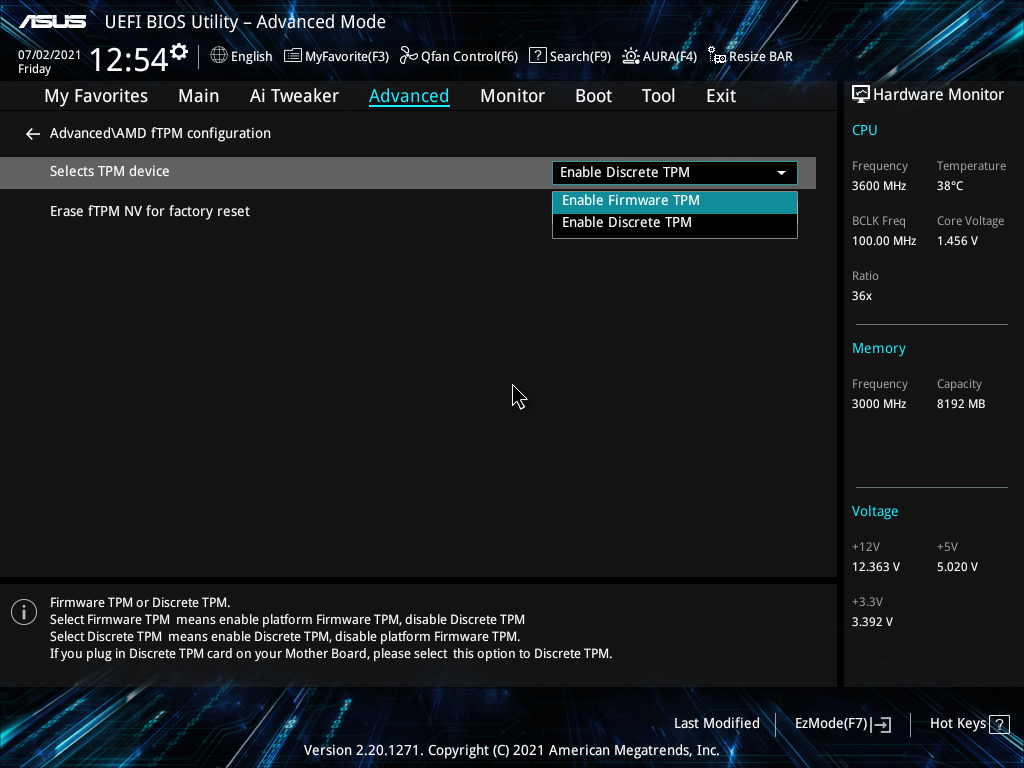
ASUS AMD
- Click on the Advanced at the top of the screen.
- Click on "AMD fTPM configuration".
- Find the option Selects TPM device.
- Click the Dropdown option to the right.
- Select Enabled Firmware TPM to activate it.
- Now the line item should say Selects TPM device [ Enable Firmware TPM].
- Click the Exit Tab on the upper right corner of the window.
- Select Save and Exit.
- Your computer should now restart and you can follow the instructions above to continue with your upgrade.
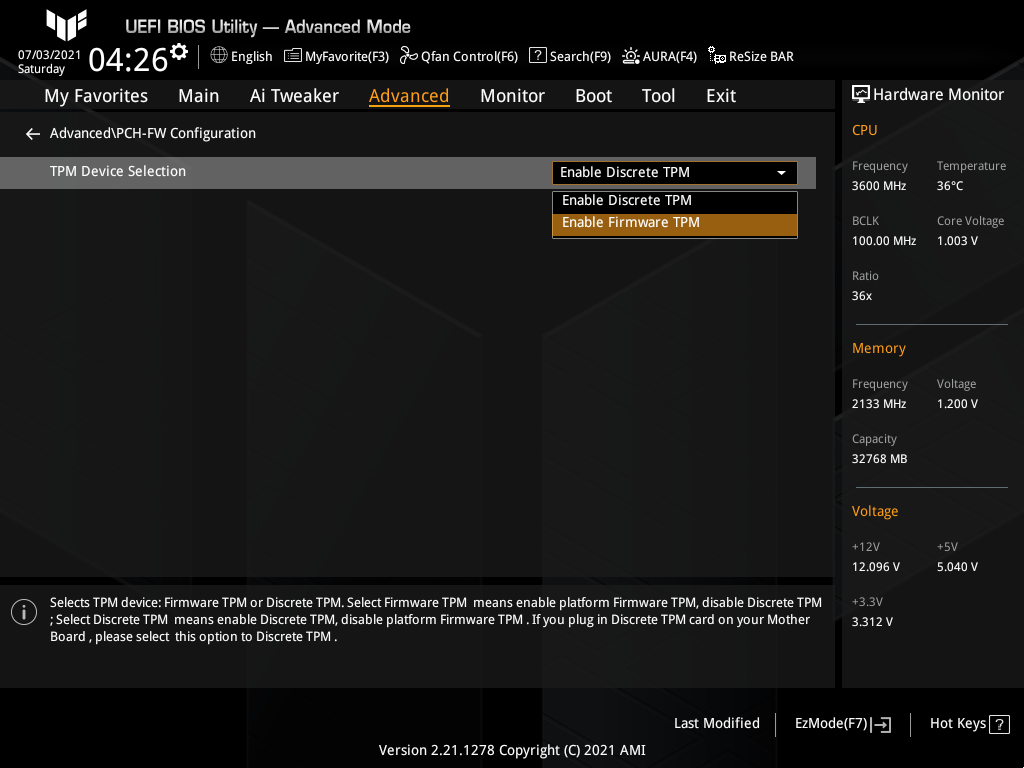
ASUS Intel
- Click on the Advanced at the top of the screen.
- Click on "PCH-FW configuration".
- Find the option TPM Device Selection.
- Click the Dropdown option to the right.
- Select Enabled Firmware TPM to activate it.
- Now the line item should say TPM Device Selection [ Enable Firmware TPM].
- Click the Exit Tab on the upper right corner of the window.
- Select Save and Exit.
- Your computer should now restart and you can follow the instructions above to continue with your upgrade.
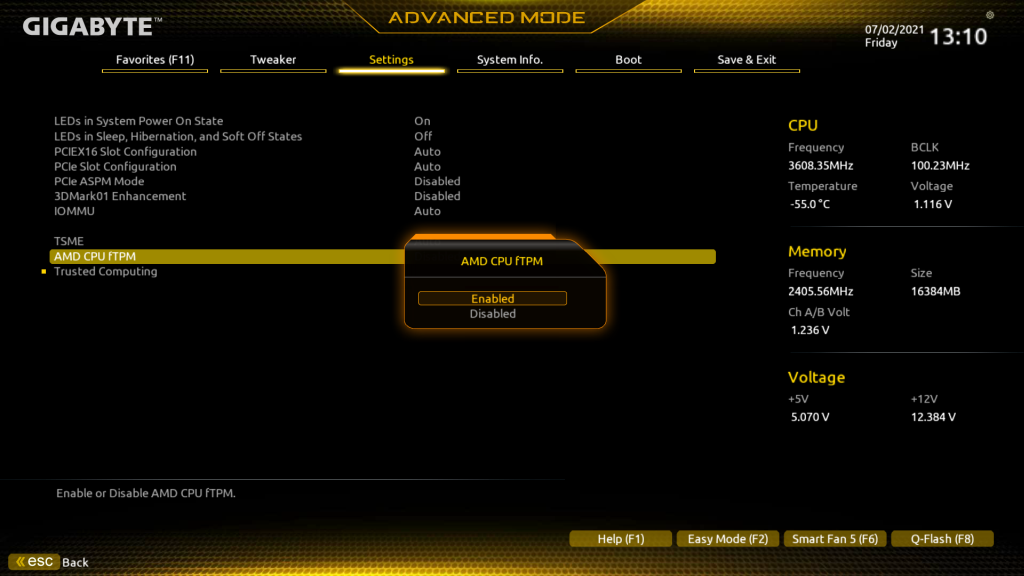
Gigabyte / Aorus AMD
- Click on the Settings at the top of the screen.
- Find the option AMD CPU fTPM.
- Click the Disabled option to the right.
- Select Enabled to activate it.
- Now the line item should say AMD CPU fTPM [ Enabled ].
- Click the Save & Exit Tab on the upper right corner of the window.
- Select Save and Exit.
- Your computer should now restart and you can follow the instructions above to continue with your upgrade.
Gigabyte / Aorus Intel
- Click on the Settings at the top of the screen.
- Find the option Intel Platform Trust Technology (PTT).
- Click the Disabled option to the right.
- Select Enabled to activate it.
- Now the line item should say Intel Platform Trust Technology (PTT) [ Enabled ].
- Click the Save & Exit Tab on the upper right corner of the window.
- Select Save and Exit.
- Your computer should now restart and you can follow the instructions above to continue with your upgrade.

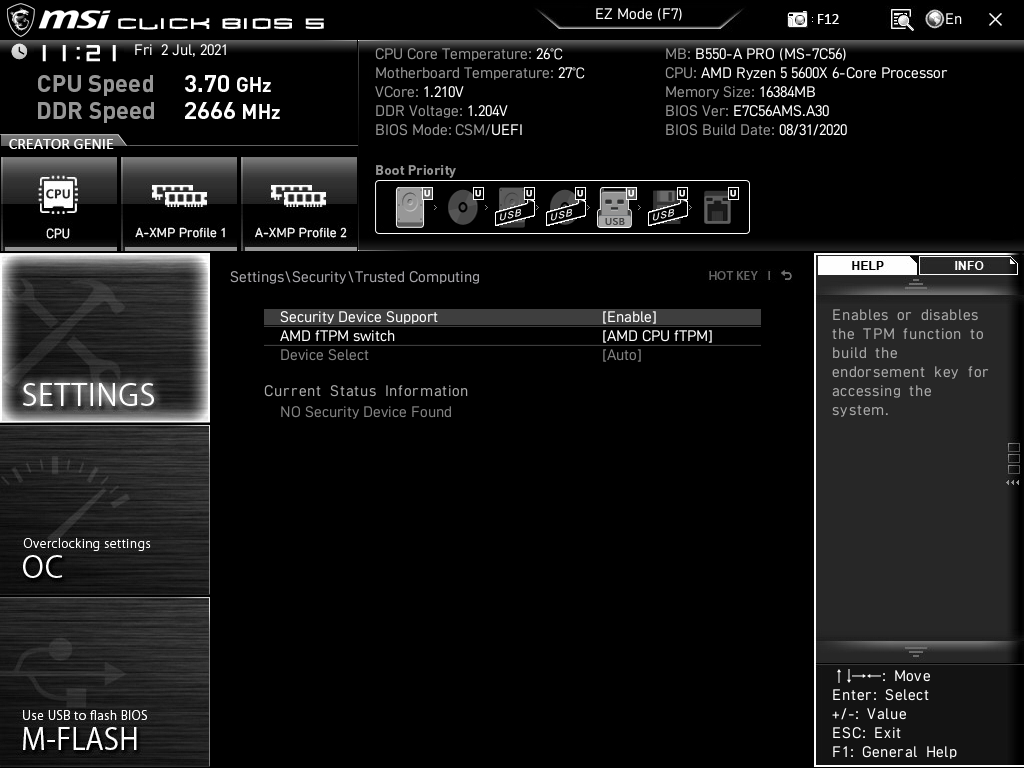
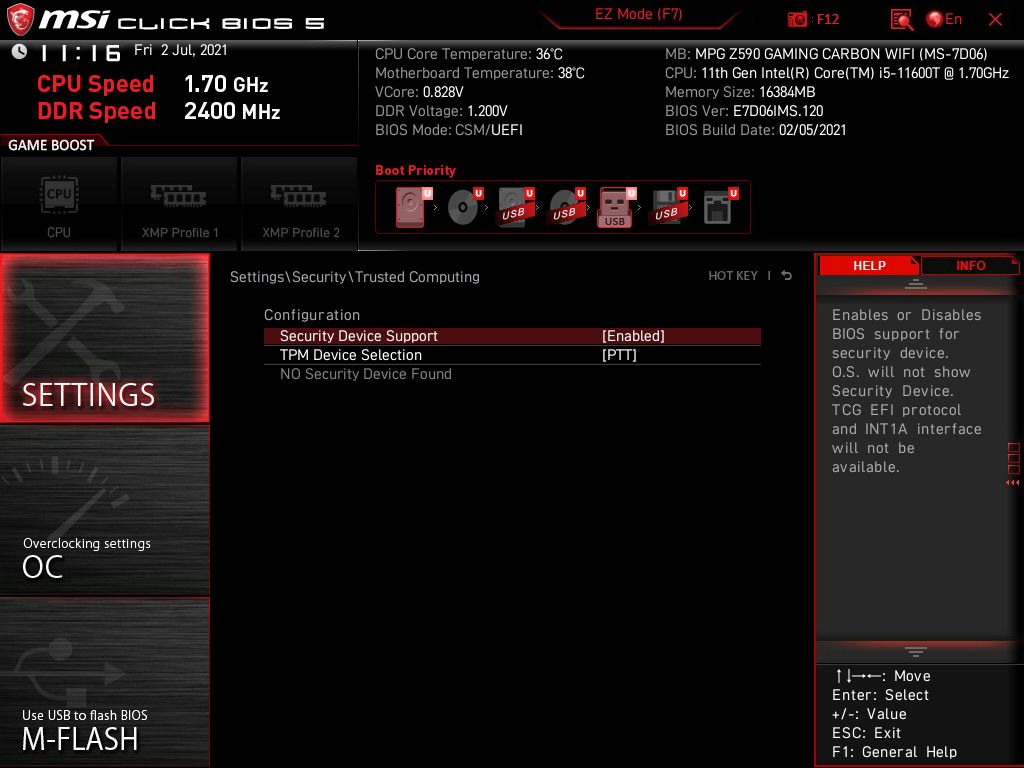
MSI AMD
- Click on the Settings at the left of the screen.
- Find the option Security Device Support.
- Click the Disable option to the right.
- Select Enable to activate it.
- Now the line item should say Security Device Support [ Enable ].
- Press the ESC key or click the X close button on the upper right corner of the window.
- Select Save and Exit.
- Your computer should now restart and you can follow the instructions above to continue with your upgrade.
MSI Intel
- Click on the Settings at the left of the screen.
- Find the option Security Device Support.
- Click the Disabled option to the right.
- Select Enabled to activate it.
- Now the line item should say Security Device Support [ Enable ].
- Press the ESC key or click the X close button on the upper right corner of the window.
- Select Save and Exit.
- Your computer should now restart and you can follow the instructions above to continue with your upgrade.
If the problem continues to persist, please contact CyberPowerPC support for further detailed support.
Comments
10 comments
Note that for the Gigabyte / Aurus AMD instructions, the AMD CPU fTMP option is found under Settings / Miscellaneous, not directly under Settings as implied.
It seems like you're interested in enabling TPM 2.0 on a CyberPowerPC system, possibly for enhancing security features like BitLocker or Windows 11 requirements. Generally, enabling TPM involves accessing the BIOS/UEFI settings. Here are some quick steps to guide you through the process:
Reboot your system and enter the BIOS/UEFI setup. Typically, you do this by pressing a specific key (like
Del,F2, orF10) as your computer boots up. The exact key can depend on your motherboard, so check your CyberPowerPC documentation if you're not sure.Locate the TPM settings. Look through the BIOS/UEFI menu for a section labeled something like "Security," "Trusted Computing," or "Advanced." Here, you should find the option to enable TPM.
Enable TPM. Once you've found the TPM setting, toggle it to enable. There may also be an option to choose between different versions of TPM—make sure it's set to 2.0.
Save and exit. After enabling TPM, save your BIOS/UEFI changes and restart your computer. You can usually do this by pressing a key to save (like
F10) and then confirming.After rebooting, TPM 2.0 should be enabled, allowing you to take advantage of enhanced security features or meet the system requirements for specific software.
For more information about security and cybersecurity practices, check out the https://www.wizlynxgroup.com/hk/en/. They offer comprehensive cybersecurity services and insights, which could be beneficial if you're exploring broader security topics beyond enabling TPM.
I hope this helps! If you have any further questions, feel free to ask.
To enable TPM 2.0 on your CyberPowerPC system, follow these steps:
1. Check for TPM Support https://betterjoy.net/
Before enabling TPM 2.0, ensure your system has a TPM 2.0 chip installed:
Open Device Manager:
Locate TPM:
2. Enter BIOS/UEFI Setup
Restart Your Computer:
DEL,F2, orESC. The key varies by manufacturer, so refer to your CyberPowerPC’s manual if needed.Navigate to TPM Settings:
3. Enable TPM 2.0
Find TPM Configuration:
Enable TPM:
Save and Exit:
F10or selecting "Save & Exit" from the menu.4. Verify TPM 2.0 in Windows
Open TPM Management:
Win + R, typetpm.msc, and pressEnter.Check TPM Status:
Troubleshooting
All I want is to know if my computer is able to be upgraded to 32mb from 16
CYBERPOWERPC Gamer Master Gaming PC, AMD Ryzen 7 8700F 4.1GHz, GeForce RTX 4060 Ti 8GB, 16GB DDR5, 1TB PCIe Gen4 SSD, WiFi Ready & Windows 11 Home (GMA2900A)
Can someone assist me, I purchased my CyberPowerPC from a private seller however when they sold it to me they never gave me the BIOS password and they themselves said they've never touched the BIOS or anything so neither do I or the first owner know the password to the BIOS, is there anyway to reset my BIOS Password from my pc. I've already torn down my PC and cannot find a CMOS battery so therefore i do not know what else to do now.
This was a really helpful walkthrough! I’ve been struggling for a while to figure out how to enable TPM 2.0 on my CyberPowerPC so I could finally upgrade to Windows 11, and most of the guides out there were either confusing or missing key steps. The way you broke it down here — especially showing exactly where to find the TPM settings in the BIOS and explaining what each option actually means — made everything so much clearer.
To enable TPM 2.0 on a CyberPowerPC system, start by restarting your computer and entering the BIOS. Most CyberPowerPC systems use gaming motherboards from ASUS, MSI, Gigabyte, or ASRock, so the key to enter BIOS is usually Delete or F2. Once you are inside the BIOS, look for the advanced settings related to security or CPU configuration. If your system uses an AMD processor, the TPM setting is usually listed as Firmware TPM or fTPM. If your system uses an Intel processor, the setting appears as PTT, which stands for Platform Trust Technology. Turn this option on and make sure Secure Boot is available if you plan to use it. After enabling TPM or PTT, save your settings and exit the BIOS. The system will restart and Windows should now detect TPM 2.0. You can confirm it is active by checking the security settings inside Windows. If the option does not appear in the BIOS, update your motherboard BIOS to the latest version and check again, because older firmware may hide or disable TPM features. Once enabled, TPM 2.0 will allow compatibility with features like Windows 11 installation and certain security tools.
Thank you for the detailed guide! I’ve started going through the steps you've outlined to address the blue screen errors and game crashes. I’ve already reseated the RAM and plan to run the Windows Memory Diagnostic and SFC scan next. Hopefully, that helps stabilize the system.
Also, just a quick note — I’ve got a Cost Estimating Services coming up soon, so I might need to delay the final steps like reinstalling Windows until after that. I’ll update you once I’ve completed all the diagnostics.
You can upgrade from Windows 10 Home to Pro without reinstalling by using the Windows Store or a valid Pro license key. Go to Settings > Update & Security > Activation, choose Go to the Store to buy the upgrade, or select Change product key if you already have one. The process keeps your files and apps intact, similar to accessing advanced features through swiss chalet menu, and once completed, your Pro license is linked to your Microsoft account for easy future use.
Thank you for the detailed guide! I’ve started going through the steps you've outlined to address the blue screen errors and game crashes. I’ve already reseated the RAM and plan to run the Windows Memory Diagnostic and SFC scan next. Hopefully, that helps stabilize the system.
Also, just a quick note — I’ve got a tv mounting new farm coming up soon, so I might need to delay the final steps like reinstalling Windows until after that. I’ll update you once I’ve completed all the diagnostics.
Article is closed for comments.